Technical Guide
This page introduces the tools and code you use to develop the program you will submit to the competition. Read the five items below in order and you will have a clear picture of where you develop, what you use to talk to the robot, and where your code starts.
Simulation platform (for practice) — a simulation environment where you connect the program you developed locally and practice with it. It is built to be almost identical to the virtual campus used in the preliminary and final rounds, so you can practice ahead of time in what is effectively the real competition environment.
marc_sdk— a Python library that lets your program talk to the platform over ROS 2. It turns receiving sensor data such as camera images, controlling the robot, and submitting answers into a handful of function calls. The SDK handles the complicated parts of the communication for you, so you can focus only on perception (VLA) and driving logic.Baseline code (demo) — example code in which the whole flow, from registration through answer submission and robot driving, is already wired together. It is a starting point where you only need to swap the perception-and-decision parts for your own real implementation.
Dataset generator — a tool that automatically produces images and their ground-truth labels, used when you train a model (such as an object detector) that recognizes objects in CCTV footage.
Manipulation learning kit (optional) — reference code you consult when practicing and implementing the motion of picking up an object with the robot arm and moving it (pick-and-place).
All five items below are organized in the same order — first an overview, then the features provided, and finally which folder to use them in and how (usage). When you need the exact specification of the messages exchanged with the robot and sensors, see the API Reference.
Simulation platform (for practice)
The simulation platform is the runtime environment where, before submitting the agent you developed, you connect it on your own PC and practice repeatedly. On a virtual campus almost identical to the preliminary and final rounds, you work with the robot and sensors exactly as they are.
Features provided
A virtual campus (digital twin) almost identical to the competition, the robot (4-wheel chassis + 6-axis arm), fixed CCTV, robot cameras and lidar sensors, and the ROS 2 interfaces used to exchange data with them.
Two practice scenarios with different characteristics.
marc2026_chungmu— a comprehensive practice scenario containing a full set of problems in the same format as the real competition. It includes the answers, so you can also see the self-scored result of how many points the answer you submitted receives.marc2026_demo— a demo scenario for quickly checking that the baseline code runs from start to finish without issues, from registration through answer submission and driving. It is a variant ofmarc2026_chungmuso the whole flow can be demonstrated in a short time.
A selection feature for choosing which scenario to launch and which of that scenario’s problems to submit.
The scenario used for the actual scoring is not made public, so practice by learning the format and flow with the two scenarios above and then preparing your real perception-and-decision code.
Usage
Run it from the starter kit’s simulation-platform/ folder. You typically proceed in the
order (1) set up the competition environment (choose scenario and problems) -> (2) run
the platform, and during development you repeat this cycle while changing the settings.
(1) Set up the competition environment (choose scenario and problems)
First decide what you will submit — which problems of which scenario. This setting is saved
in the platform folder’s .env and applies from the next run.
Choosing a scenario. Which scenario to run the platform with is set by
ENV_MARC_SCENARIO (default marc2026_chungmu). If you set it in .env (recommended) it
applies from the next run, and to change it just for one run you may specify it temporarily
in front of the run command.
# simulation-platform/.env
ENV_MARC_SCENARIO=marc2026_demo
Choosing problems (problems.yaml). A scenario contains several problems, and during
development you often need to select only certain problems and test them repeatedly. If a
problems.yaml file exists, the platform presents only the problems selected in that file,
and if the file does not exist it presents all problems. No separate environment
variable is needed.
Select the problems to submit with the checklist in the command below (move up/down, toggle
with the space bar). When you save, an active file problems.yaml and a per-scenario
archive problems.<scenario>.yaml are created together in the kit root, and they apply
automatically from the next run. To revert to all problems, delete problems.yaml.
bash simulation-platform/marc.sh select marc2026_chungmu # or marc2026_demo
Note
Problem selection runs inside the platform container and reads the scenario straight from the image. So the first time you run it, if the platform image is not built yet it is built first, then the selection proceeds (only the first run takes a while; afterwards it opens instantly).
Note
Problem selections are archived per scenario. Running select saves both that scenario’s
archive problems.<scenario>.yaml and the active file problems.yaml that the platform
reads, and running select again for the same scenario loads your previous selection so you
can continue editing. When it runs, the platform falls back to all problems if the
scenario in problems.yaml differs from the current scenario — it ignores that file and
leaves a warning — so if you changed the scenario, run select again for that scenario.
Problem names that are not in the scenario are ignored with only a warning left behind.
(2) Run the platform
Once the environment is set up, run the platform. Your scenario (.env) and problem
(problems.yaml) selections apply as-is.
cd simulation-platform
docker compose --profile platform up   # or: bash marc.sh platform
(3) Run your program and check the score
With the platform running, start the program (agent) you developed. The platform gives out problems exactly as it does in the qualifiers and the finals. When your agent submits an answer, the result is scored automatically and shown on the platform screen.
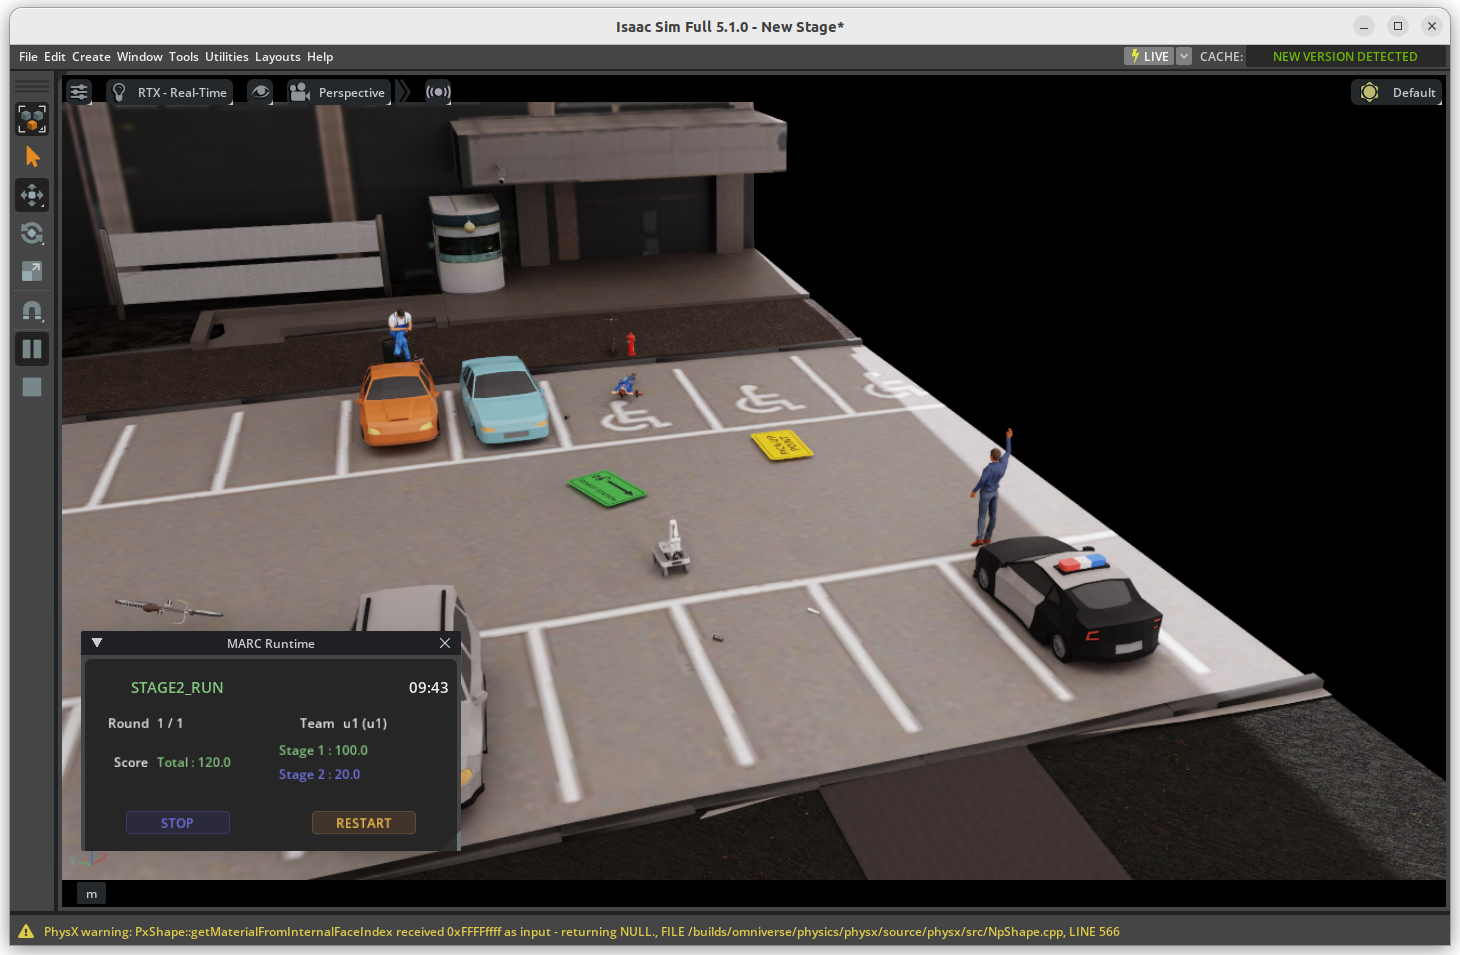
The platform screen — connect your program and run it, and the score computed at the end of a round is shown on the screen.
The scoring is described in outline only. The exact thresholds and weights are not disclosed.
Stage 1 — VLA grounding is repeated as rounds, as many as the number of problems you selected, and the average of the round scores becomes your Stage 1 score. Each round evaluates the following.
Camera selection — did you pick the camera the target is visible in.
Object and situation interpretation — did you interpret the target’s type, and for a person the situation, correctly. A person’s situation is one of
accident,emergency,abnormalandnormal, and those four are defined by the rule data inscenarios/situation_rules.yaml, which ships with the practice content. The submitted value must match exactly.Landmark and spatial relation — did you point to the reference landmark and its positional relation correctly.
Accuracy of the anchor and target coordinates — the closer the estimated coordinate is to the correct one, the more partial credit it receives.
Stage 2 — the following three technical elements are added up.
VLA grounding — did you interpret the target correctly and estimate its coordinate accurately.
Picking up the item — did you pick up the right item (correct / wrong item / failed).
Moving it to the designated place — did you carry the item you picked up to the designated place and put it down.
When scores are tied, the participant who finished faster is ranked higher.
You check the score on the platform screen. Run the platform in GUI mode and the MARC Runtime
panel shows the team, the total score, and the Stage 1 and Stage 2 scores.
The local score is for reference. Official scoring is run with competition scenarios that are not published.
To test with a different scenario or different problems, go back to (1), change the settings, and run again — during development this “configure -> run -> check” loop is the basic flow.
MARC Client SDK (marc_sdk)
At the center of this SDK is a single class, MARCClient. The ROS 2 communication with the
platform — the registration handshake, distinguishing message types, session and sequence
management, QoS, and CCTV camera auto-discovery — is all handled internally by MARCClient.
So you can focus on perception (VLA) and driving logic without knowing the details of the
communication.
Features provided
Callback model — when an event occurs, such as a new mission arriving, a state change, or a scoring result arriving, the SDK automatically calls the callback function you registered.
Sensor query, robot control, and answer submission methods — reading sensors such as cameras and lidar, controlling the robot, and submitting answers are all done with function calls.
Automatic ROS 2 communication — the registration handshake, message distinction, session and sequence management, QoS, and CCTV camera auto-discovery are handled internally.
The full list of callbacks and methods, with their signatures, parameters, and return values, is in the API Reference. Here we cover only the basic usage of initializing and wiring up your first callback.
Usage
marc_sdk is not a package you install with pip; it is included as source in the starter
kit root’s marc_sdk/ folder. Just point Python at its path and you can import and use it
right away.
Preparation and initialization
# Submission image (Docker): marc_sdk source is COPYed into the image and added to
#   PYTHONPATH (see demo/Dockerfile). No action needed.
# Host-side dev: add marc_sdk's parent folder (the starter-kit root) to PYTHONPATH so it imports.
#   demo/launch.sh does this automatically. To set it manually:
export PYTHONPATH="<starter-kit-root>:${PYTHONPATH}"
from marc_sdk import MARCClient

client = MARCClient.from_env()   # reads MARC_TEAM_ID / MARC_TOKEN
client.connect()                 # handshake (HELLO -> CHALLENGE -> PROOF -> ACK), automatic
from_env() reads the team ID and authentication token from the environment variables
MARC_TEAM_ID and MARC_TOKEN and creates the client. These two values are the team ID
and team authentication token you are issued after applying to enter the competition via the
Google Form. They are usually set as environment variables in the submission
docker-compose.yml (-> Submission Guide). Instead of environment
variables you can also pass the values directly, as in MARCClient(team_id=..., token=...).
Next, connect() performs the entire challenge-response handshake and starts a background
executor.
Wiring up to the platform with callbacks
If you register a callback function on the decorator that corresponds to each event, the SDK automatically calls that registered callback function when the event occurs. So you only need to implement and register a callback function to handle each event, and you can integrate with the platform without knowing how the communication works. Below is the simplest form: receiving a Stage 1 mission and submitting an answer.
from marc_sdk import MARCClient

client = MARCClient.from_env()

@client.on_mission
def handle_mission(mission):              # a Stage 1 problem arrives
    result = my_vla(mission.voice_command)  # your perception -> GroundingResult
    client.submit_grounding(result)

client.connect()   # register + handshake
client.run()       # spin in the background (blocks)
You register callback functions for other events the same way — the Stage 2 mission
(on_stage2_mission), the start of driving (on_stage2_run), the scoring result
(on_score), and so on. Which events exist, when each callback fires and what values it
receives, and the signatures, parameters, and return values of the sensor-query,
robot-control, and answer-submission functions are covered in detail in the
API Reference.
Baseline code (demo)
The starter kit includes baseline code (a demo) in which the whole flow — from registration
through answer submission and robot driving — is already wired together. Only the
perception-and-decision parts are filled in with mock implementations, so you can use this
code as a starting point and replace those parts with your real implementation. Instead of
perceiving with CCTV and sensors, the three mock_agent_* agents work by looking up values
pre-extracted into the demo data file mock_demo_data.yaml (the answer coordinates and
obstacles for each problem).
mock_demo_data.yaml is demo-only data extracted from the scenario
The Stage 1 and Stage 2 per-problem answer coordinates and obstacles in mock_demo_data.yaml
are produced by tools/mock_data_builder, which extracts the answers and mixes in some
random wrong answers from the demo scenario (scenarios/marc2026_demo.yaml). In the real
scoring environment there is neither a scenario nor runtime ground truth, so you must
replace the three mock agents that use this data with your own real perception-and-detection
code.
Features provided
Runnable example code in which the whole flow, from registration through answer submission and robot driving, is already wired together.
Three mock agents (perception, navigation, manipulation) that stand in for perception-and-decision — making it clear where to swap in your real code.
Stage 2 driving: a mock navigation implementation that plans a route using pre-extracted obstacle data — something to replace or improve.
Usage
The baseline code is where you start development. A typical workflow looks like this.
        flowchart TD
    A["Copy demo/ into your dev environment"] --> B["Replace the mocks with your real perception/decision code"]
    B --> C["Run and check on the host<br/>(launch.sh)"]
    C -->|keep editing| B
    C -->|mostly done| D["Verify it also runs in Docker<br/>(docker compose up)"]
    D -->|something's off| B
    D -->|passes| E["Final submission"]
Judging also runs your submitted Docker with docker compose up, so you must confirm the Docker
run at least once before submitting.
Both ways below run from the demo/ folder, and you pass your team ID and token along.
1) Iterating during development — run directly on the host. When you edit code often, it is faster to run on the host instead of rebuilding the Docker image every time. Keep the platform running in Docker and run only the demo.
cd demo
MARC_TEAM_ID=u1 MARC_TOKEN=<your-token> ./launch.sh
launch.sh sets up the ROS 2 humble environment (system /opt/ros/humble or the Isaac Sim built-in
bridge), the PYTHONPATH, and the placo install automatically. The host must already have ROS 2
humble (or Isaac Sim) and numpy, pyyaml.
2) Verifying before submission — run in Docker. Once it is mostly working, confirm the behavior in Docker, the same way it is submitted and judged. The command below runs as-is in the judging environment (the required dependencies are baked into the image, so nothing to install on the host).
cd demo
export MARC_TEAM_ID=u1
export MARC_TOKEN=<your-token>
docker compose up
File structure
The “Kind” column below indicates whether each file is a mock you must replace or the required code you use as-is.
File |
Kind |
Role |
|---|---|---|
|
Required (entry point) |
Registers callbacks on |
|
mock — replace |
Stage 1/2 perception (VLA) mock. Does not analyze CCTV; uses the received natural-language command to look up the per-problem answer in |
|
mock — replace or improve |
Stage 2 navigation mock. Plans a route and drives using pre-extracted obstacle data |
|
Reference (use as-is) |
The demo’s actual picking motion. The same code as the manipulation kit ( |
|
Reference (fallback) |
A fixed-keyframe pick that needs no |
|
Demo data |
The Stage 1/2 answer coordinates + obstacles pre-extracted from the scenario, referenced by the mock agents (demo-only — see the overview) |
The three mock_agent_* files are the mock implementations that stand in for the agent
code you will develop (perception, navigation, manipulation). participant_app.py calls
them and only wires the overall flow together.
Execution flow
Start and register —
participant_app.pycreatesMARCClient, registers callbacks, thenconnect()(register ->SESSION_ACK) ->run()(start receiving in the background).Stage 1 (perception, coordinate submission) — each round, in the
on_missioncallback,mock_agent_vla.process()finds the answer matching the received natural-language command and returns it as aGroundingResult, which is submitted withsubmit_grounding().Stage 2 interpretation — in the
on_stage2_missioncallback,mock_agent_vla.process_stage2()finds that problem’s answer and returns it as aGroundingResult, which is submitted withsubmit_stage2_grounding(). It also stores theowner_position(placement location) received alongside.Stage 2 reveal — in the
on_stage2_revealcallback, it stores the approximate location hint (hint_center) as the collection target.Stage 2 driving — in
on_stage2_run(a separate thread): (1) navigate to the collection point -> on arrival, pick with the robot arm; (2) navigate to the placement location (owner_zone) -> on arrival,task_complete().
The parts handled by mock implementations
These are the three parts the demo fills in with pre-extracted values from
mock_demo_data.yaml instead of real perception-and-decision, and they are where you swap in
your real code.
mock_agent_vla.py— Stage 1/2 perception (VLA). Instead of analyzing CCTV, it uses the received natural-language command to find the per-problem answer coordinate in the demo data and submit it.mock_agent_navigation.py— Stage 2 navigation. Instead of detecting obstacles with sensors, it plans a route and drives using pre-extracted obstacle data.Robot arm picking — the picking motion is performed by
arm_pick.py(the manipulation kit); only the pick location is supplied by the mock perception (VLA) from the demo data. Replace that location computation with real perception.
Since all three agents depend on the demo data, in the real competition you must replace them with your own real perception-and-detection code.
Important
What you replace is the “algorithm”, not the “platform integration”. What is mock is only
the perception, decision, and route logic inside the three agents above. By contrast, the
marc_sdk calls that participant_app.py uses to exchange data with the platform — register
and handshake (connect), callback registration (on_mission, on_stage2_mission,
on_stage2_run, etc.), answer submission (submit_grounding, submit_stage2_grounding),
sensor queries (get_cctv_image, get_occupancy_map), robot control (send_cmd_vel), and
completion notice (task_complete) — are exact example code you should use as-is. Keep
this integration skeleton and replace only the algorithm that produces the value each
callback returns with your real implementation.
Code structure
The skeleton of participant_app.py is as follows. It registers callbacks and, in each
callback, calls SDK functions. Replace only the mock parts (the comments below) with your
implementation and the rest of the flow works as-is.
from marc_sdk import MARCClient, GroundingResult
from mock_agent_vla import MockVLAGrounding


class DemoParticipant:
    def __init__(self):
        self.client = MARCClient.from_env()
        self.vla = MockVLAGrounding()          # <- replace with your VLA model
        self._register_handlers()

    def _register_handlers(self):
        c = self.client
        c.on_mission(self._on_mission)                # Stage 1
        c.on_stage2_mission(self._on_stage2_mission)  # Stage 2 interpretation
        c.on_stage2_reveal(self._on_stage2_reveal)    # approx. location hint
        c.on_stage2_run(self._drive)                  # Stage 2 driving (own thread)

    def _on_mission(self, mission):
        # mock: look up the pre-extracted answer -- replace with real CCTV perception
        result = self.vla.process(mission.voice_command, self.client.list_cctv())
        self.client.submit_grounding(result)          # GroundingResult

    def _drive(self):
        # navigate to the object -> arm pick -> navigate to the delivery point
        while self.client.is_running:
            twist = self._plan_step()                 # plan a path to the target and follow it
            self.client.send_cmd_vel(**twist)
        self.client.task_complete()

    def run(self):
        self.client.connect()   # register -> SESSION_ACK
        self.client.run()       # spin (background)


DemoParticipant().run()
Starting development from the baseline
Replace
mock_agent_vla.pywith a real VLA — implement it to receive CCTV footage viaclient.get_cctv_image()and the like, find the target, and return aGroundingResult. As long as the return format matches, the rest of the flow works as-is.Replace the Stage 2 grounding with your real result — replace the answer coordinate that was looked up in
mock_demo_data.yamlwith your own grounding result (you may reuse the same VLA inprocess_stage2()).Remove the scenario dependency — change it to detect obstacles with
get_occupancy_map()and the lidar/camera sensors instead ofmock_demo_data.yaml(the scenario extract).Improve navigation and picking if needed —
mock_agent_navigation.pyand the pick (arm_pick.py+ the manipulation kit) can earn partial score as-is, so replace perception (1 and 2) first and improve these afterward.Use the reveal hint — in Stage 2, even if the grounding is wrong, you can continue the collection drive using the approximate location from
on_stage2_reveal(the demo already works this way).Submit — after replacing the mocks with your real implementation, build and submit with Docker following the procedure in the Submission Guide.
Navigation needs no learning environment
Obstacles are static (people do not move), so standard ROS 2 navigation suffices: global occupancy planning + lidar-based local avoidance. The occupancy map contains drivable road only, so detect people and landmarks with sensors.
Dataset generator
To train a perception model that finds objects and people in CCTV footage, you need training data with labels (ground truth). The dataset generator places the competition’s objects, landmarks, and people within the same CCTV field of view as the simulation platform (shared by practice and competition), and automatically produces images and ground-truth labels of those scenes. (It does not train the model for you — it produces the data to use for training.)
Features provided
It produces two kinds of data.
Object detection — the class and 2D bounding box of each placed object, landmark, and person.
Information for pose estimation — each CCTV’s position and orientation (extrinsics), lens information (intrinsics), and the camera image. These are the materials used to compute the target’s 3D position and orientation, and are unrelated to a person’s posture (sitting, lying down, etc.).
Note
This tool produces data for estimating the class and position/orientation of individual objects; it does not produce data for learning the relation between objects (such as an umbrella next to a bench).
Usage
From the same simulation-platform/ folder as the platform, run it while specifying only
dataset-gen as the target.
cd simulation-platform

# The two commands below do the same thing.
docker compose --profile dataset-gen up
bash marc.sh dataset-gen
Commonly used environment variables:
ENV_MARC_SCENARIO— choose the scenario to use (defaultmarc2026_demo).HEADLESS— whether to show the GUI (true/false, defaultfalse); to run with the GUI, runxhost +local:rooton the host first.TRAINER_SAVE_OFFLINE=0— turn off offline file saving and publish only ROS 2 topics.TRAINER_AUTO_SCENES— generate several scenes automatically and exit (see “Generating many scenes at once” below).
Output
Once you run the generator, there are two ways to obtain the training data.
ROS 2 topics (real time) — the participant application receives the data in real time over ROS 2 while the generator is running. It publishes the topics below per camera (
{cam}= camera id, default namespacemarc)./marc/env/cctv/{cam}/image(sensor_msgs/Image) — the camera image./marc/env/cctv/{cam}/info(sensor_msgs/CameraInfo) — lens information (intrinsics)./marc/env/cctv/{cam}/groundtruth(std_msgs/String, JSON) — the object-detection ground truth: each target’s class and 2D bounding box. Because it is static until the scene changes, it is published latched, so even if you subscribe later you immediately receive the ground truth of the current scene./tf_static(tf2_msgs/TFMessage) — each camera’s position and orientation (extrinsics). Used for pose estimation.
Offline files (repeated training) — the way to use data extracted to files when training a model repeatedly. It is saved as
trainer_output/<scenario>/scene_<number>/<camera>.json(+ a.pngof the same name), and repeated runs accumulate rather than overwriting existing scenes. A<camera>_overlay.pngis saved in the same folder as well. It is the image with the ground-truth boxes drawn on top, so opening a single one lets you confirm at a glance that the labels for that scene sit on the objects.
The ground-truth JSON is shared by the groundtruth topic and the offline files, and its form is as follows.
{
  "scene_id": 3,
  "frame_id": "rig_3_b",
  "image": { "width": 1280, "height": 720 },
  "detections": [
    { "class": "master_chef_can", "kind": "object",
      "bbox": [412, 133, 468, 210], "occlusion": 0.12 }
  ],
  "camera": {
    "prim_path": "/world/cctv_rigs/rig_3/Mounts/Mount_B/Camera_B",
    "position": [-84.50, 98.50, 18.78],
    "orientation_euler_deg": { "roll": -59.4, "pitch": 14.4, "yaw": 171.1 },
    "focal_length_mm": 5.0, "horizontal_aperture_mm": 5.6,
    "vertical_aperture_mm": 3.15, "ground_height": 16.1
  }
}
bbox is in pixel coordinates in the order [x_min, y_min, x_max, y_max], and occlusion
is the degree of occlusion (0 = not occluded).
The camera block holds each camera’s intrinsics and extrinsic. position is in world
coordinates, and orientation_euler_deg is the USD camera prim’s rotation (roll/pitch/yaw, ZYX
order).
Rotation convention
The orientation_euler_deg in this file is in the USD camera frame (-Z forward, +Y up). The
camera frame that the runtime /tf_static gives you, however, follows the ROS optical convention
(+Z forward, +Y down). The two describe the same camera but differ by a 180° rotation about
the X axis. To use it with the CameraInfo K matrix, the optical convention (i.e. /tf_static)
matches directly; if you use this file’s euler with K, account for that 180° difference.
Making varied scenes
In the Dataset Generator panel at the lower left of the GUI, choose what to place in each
scene and keep generating new scenes. The selection state is saved per scenario and persists
across the next run.
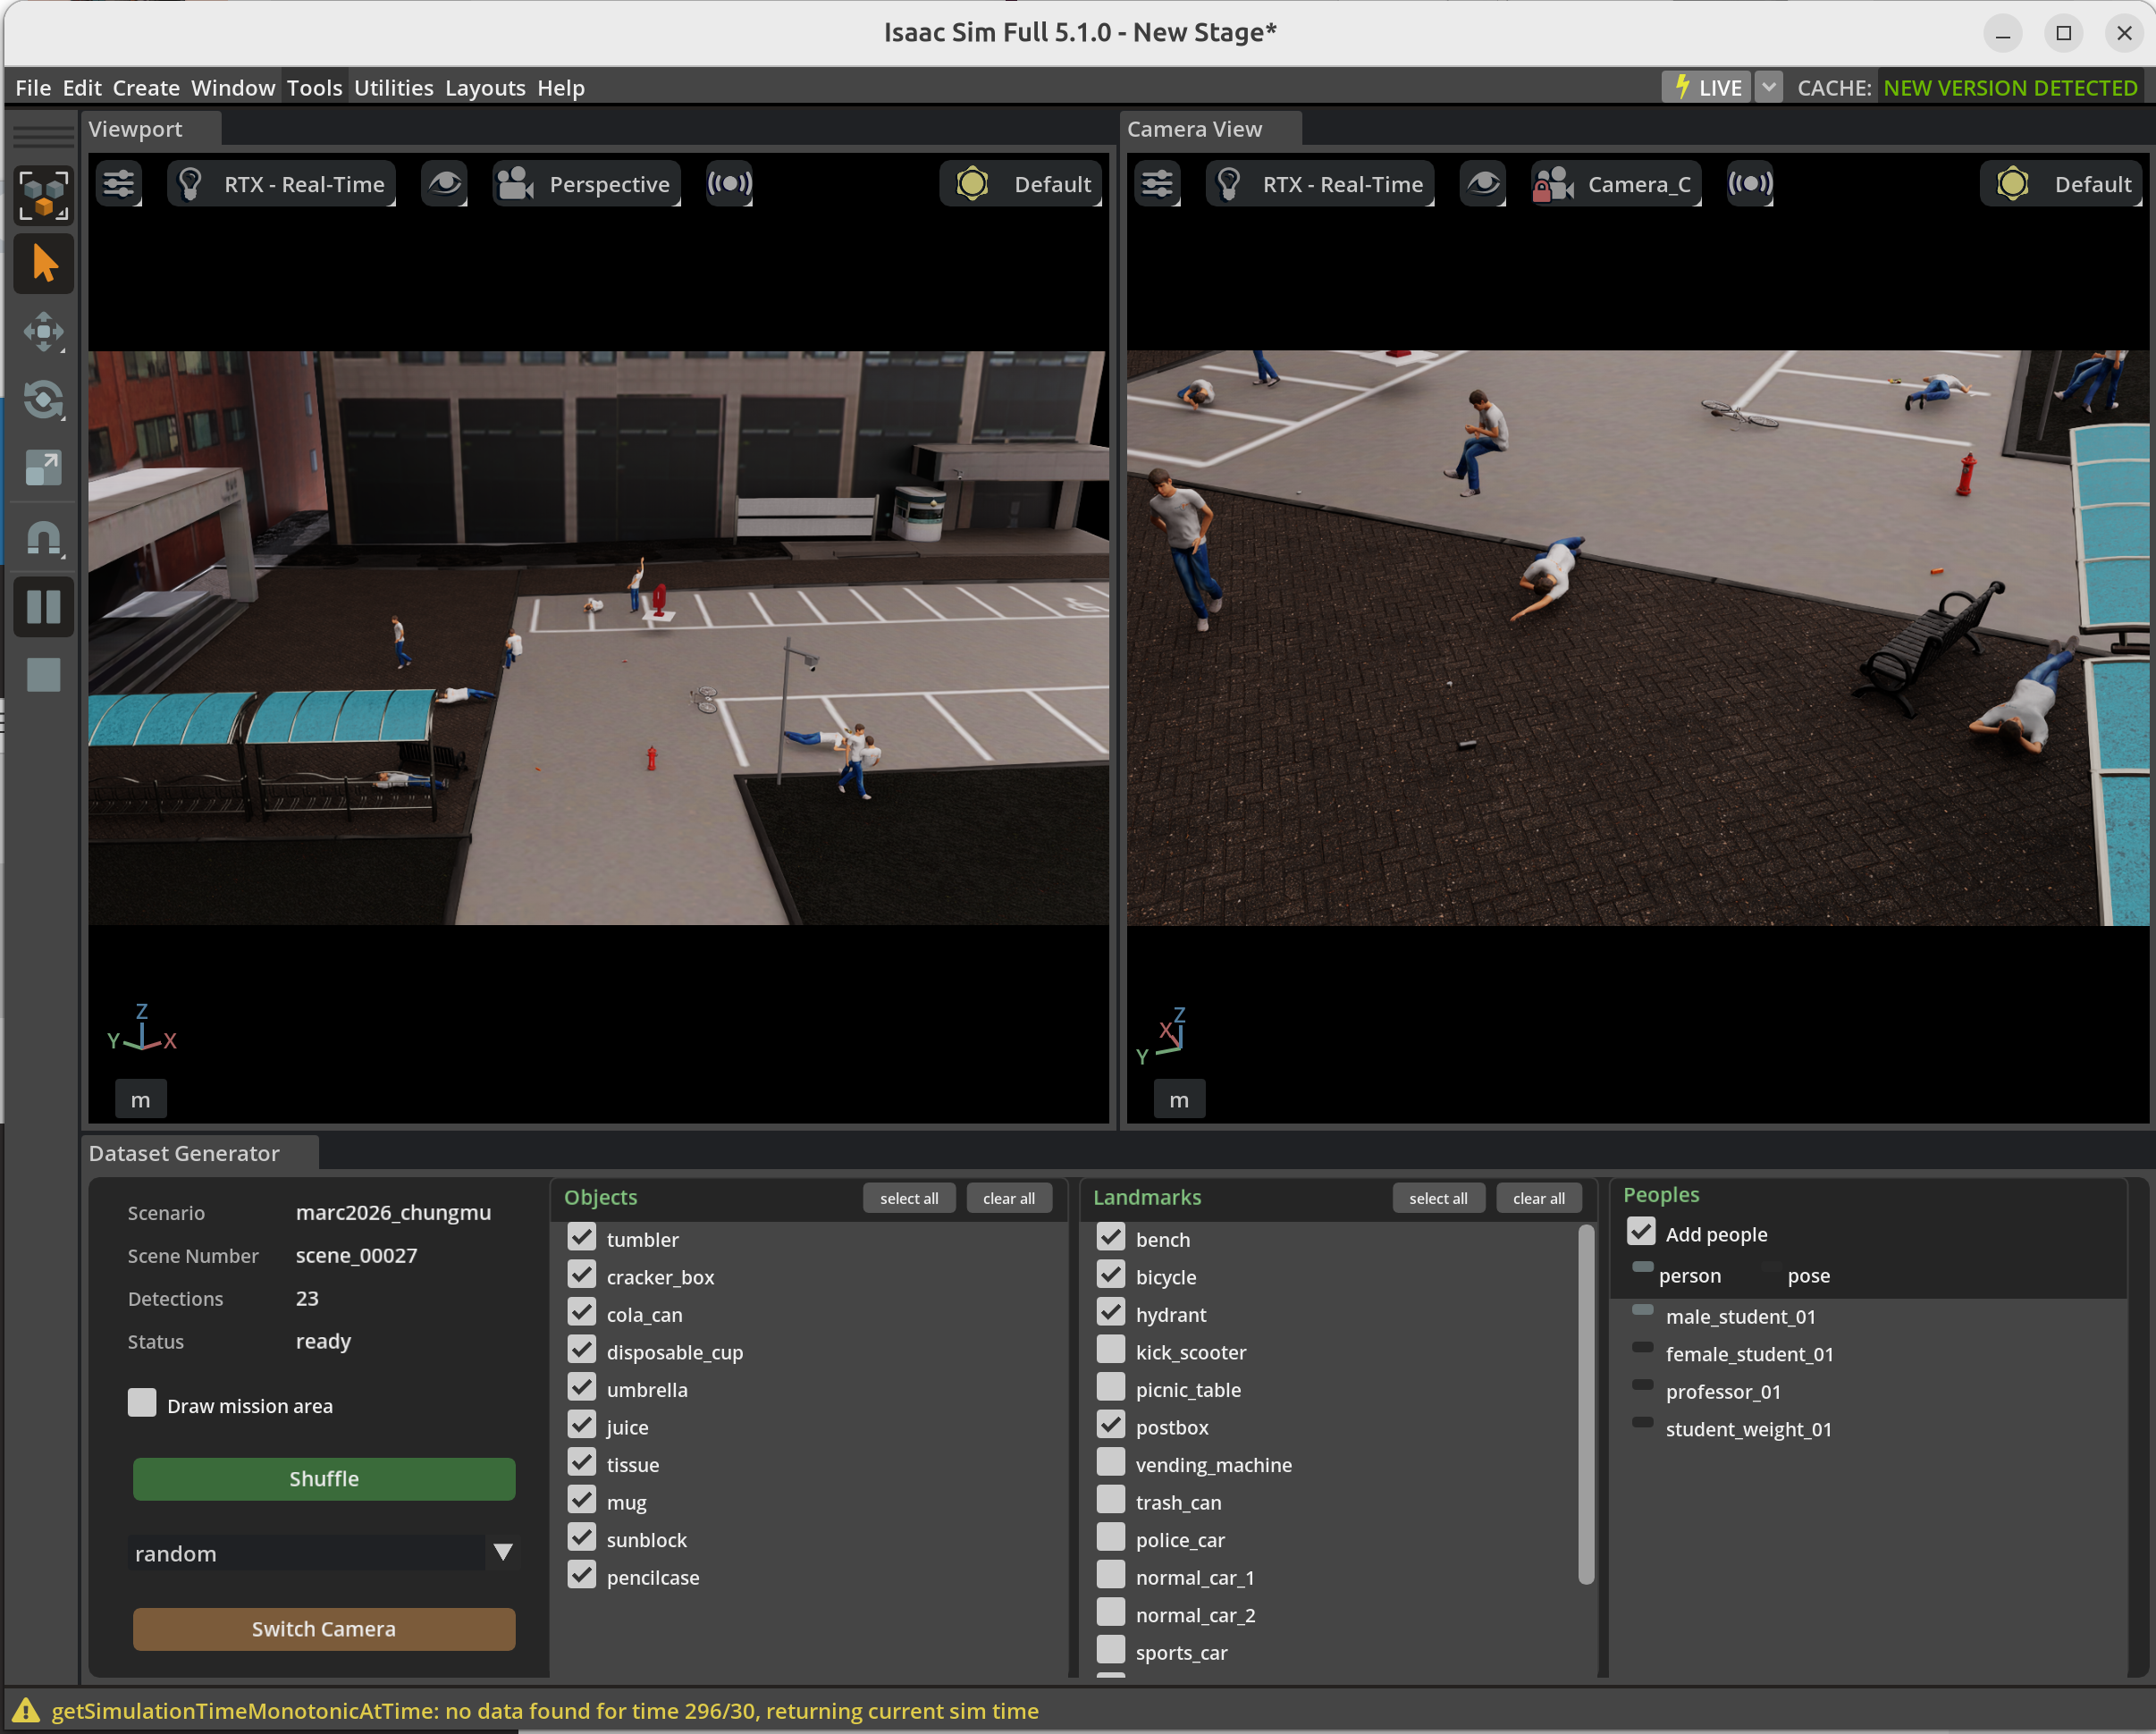
The Dataset Generator running — left: the mission-area overview (Viewport), right: the selected camera’s view (Camera View), bottom: the placement-target selection panel (Objects/Landmarks/Peoples checklists, Shuffle / Switch Camera).
Choosing what to place
Objects / Landmarks — toggle the scenario’s object types and landmark types with checkboxes (select-all/deselect supported).
Peoples — choose the people-placement mode: person or pose. person mode places a chosen person in every posture; pose mode places a chosen posture on every person. You can also turn people placement off entirely.
Regenerating a scene
The dataset generator produces data for one scene at a time — that is, one frame viewed from one camera’s viewpoint. You choose a camera, place the targets within its field of view, and record that state as one scene. You keep making new scenes with the two buttons below.
Shuffle— keeps the camera as-is and only re-places the targets in the field of view per your selection above. Use it to get several scenes with different compositions from the same viewpoint.Switch Camera— changes the camera first, then places (pick a specific camera from the camera combo, orrandomfor a random one). Use it to move on to a scene from a different viewpoint.
Generating many scenes at once
Collecting enough data for training takes a lot of scenes, and pressing the buttons that many
times is tedious. Set TRAINER_AUTO_SCENES to the number of scenes you want and the generator
creates them without the GUI and then exits. It changes the camera between scenes, so the
viewpoints are mixed as well.
cd simulation-platform

# Generate 100 scenes without the GUI, then exit.
TRAINER_AUTO_SCENES=100 HEADLESS=true docker compose --profile dataset-gen up
One run generates at most 200 scenes before exiting. If you ask for more than that, it generates 200, tells you how many are left, and stops - just run it again. Scene numbers continue from where they left off, so earlier scenes are not overwritten and the dataset keeps growing.
Tip
The default is 0. In that case the generator behaves as described above, with the GUI panel and its buttons.
Manipulation learning kit
Stage 2 picking (pick-and-place) is performed solely with joint-angle control of the robot
arm. Because the platform only accepts joint angles, you must compute the joint targets that
bring the gripper to the object yourself. To lower the barrier, the organizers provide two
things together. One is reference code that serves as a starting point for what you need to
compute (the starter kit’s manipulation/ folder); the other is a practice environment for
experimenting with and checking that code repeatedly (manipulation_trainer). Ground truth
(GT) is not provided at the competition runtime; training labels are used offline only.
Reference code — the starter kit’s manipulation/ folder
It consists of a robot kinematics model (URDF) and reference code, a starting point for you
to read and extend in your own way. The baseline demo’s picking motion uses arm_pick.py
from this as-is, so if you compute only the target position and gripper pose precisely and
pass them in, you can earn partial score by running the picking sequence itself without
touching it.
File |
Description |
|---|---|
|
Robot kinematics model (6-axis arm + Robotiq 2F-140 gripper). An information file that holds the link transforms directly so FK/IK can be solved from this one file, without external meshes |
|
A reference implementation that converts between the gripper’s target pose and the joint angles. The reference point of the gripper pose is the contact point that picks the object (the midpoint of the two finger pads). (Uses the |
|
A reference implementation that performs a series of arm-control requests, from picking the target up to placing it in the rear basket. It sets several waypoints the motion passes through, computes the joint angles at each with |
|
Pick parameters (grasp depth, gripper close, speed, etc.). Values tuned with |
arm_kin.py uses the placo library for kinematics. Install it with pip install placo; the judging
runtime has no internet, so bake it into the image at build time (see the demo Dockerfile).
The provided code and URDF can be used in two ways depending on how much you rely on them.
Using them to the maximum: leave the picking sequence (
arm_pick.py) untouched and use it as-is like a finished tool, and only compute and pass in the target position and gripper pose to pick. Even this alone runs the baseline picking motion and can earn partial score.Using them minimally: take only the FK/IK in
arm_kin.pyand the URDF as materials, and design the arm-control approach itself however you like to push the score higher. You do not have to be bound to the baseline’s approach of setting several waypoints and chaining them; you may implement it with a different control approach.
Either way, the only command that moves the robot is joint angles. You must convert the
gripper pose you want into joint angles (and vice versa) and send them as ROS 2 joint
commands, and for this conversion you use the URDF and arm_kin.py above. arm_kin.py is a
starting point you can use as-is or refine to be more precise. The robot itself is already
included in the platform.
Practice environment — manipulation_trainer
A GUI sandbox in which you repeatedly test the picking logic you wrote. From the same
simulation-platform/ folder as the simulation platform (for practice), run it by changing
only the target to manip-trainer.
docker compose --profile manip-trainer up
# or:
bash marc.sh manip-trainer
When you run the practice environment, two views and a control panel appear together. On the
left is an overview view (Viewport) that shows the robot and the object to pick at a glance;
on the right is the view from the camera mounted on the robot base (Base Camera).
Unlike the competition runtime, this practice environment has no registration step. It carries
only robot I/O, not the competition layer that registers teams and issues sessions, so you do
not need your assigned token either. As soon as the participant client starts sending arm
joint commands, they are delivered to the robot. The panel decides what to show from those
joint commands as well: before you send any it shows no client - Register / connect first,
and once you start sending it changes to team <id> connected. That first message looks like
it is asking for registration, which is a wording mistake we will correct in the next release.
If you use marc_sdk, client.connect() waits for a reply and, once the timeout passes,
logs [REGISTER] no SESSION_ACK within 30s and returns False. In the practice environment
this is the normal result — there is simply nothing on the other side to answer — and not an
error. The ROS 2 node and its communication channels already exist at that point, so arm
control and state queries work as usual. If you would rather not wait, pass a short timeout
and do not check the return value.
client = MARCClient.from_env()   # MARC_TOKEN may be any non-empty value here
client.connect(timeout=3.0)      # the trainer has no registration - ignore the result
client.send_arm_command(...)     # commands take effect right away
In the panel below, choose the object type to pick (Pick target), place the object at a
position the arm can reach directly (Place near) or one that requires moving a little
(Place far), or reset the arm pose (Reset arm pose), and repeatedly practice the picking
motion. The Info area of the same panel also shows the two signals you need to judge pick
success or failure. Gripper hold shows whether the gripper is currently holding an object
(holding / open), and Rear basket shows whether an object is in the rear basket
(loaded / empty). You can also read each with the SDK’s is_grasping() and
is_basket_occupied(), so you can detect a failed pick or an object dropped in transit and
retry.
The way you control the robot and query its state in this practice environment (ROS 2 joint
commands, is_grasping(), is_basket_occupied(), etc.) is identical to the competition
runtime. However, since it is a learning tool, it does not provide score calculation.
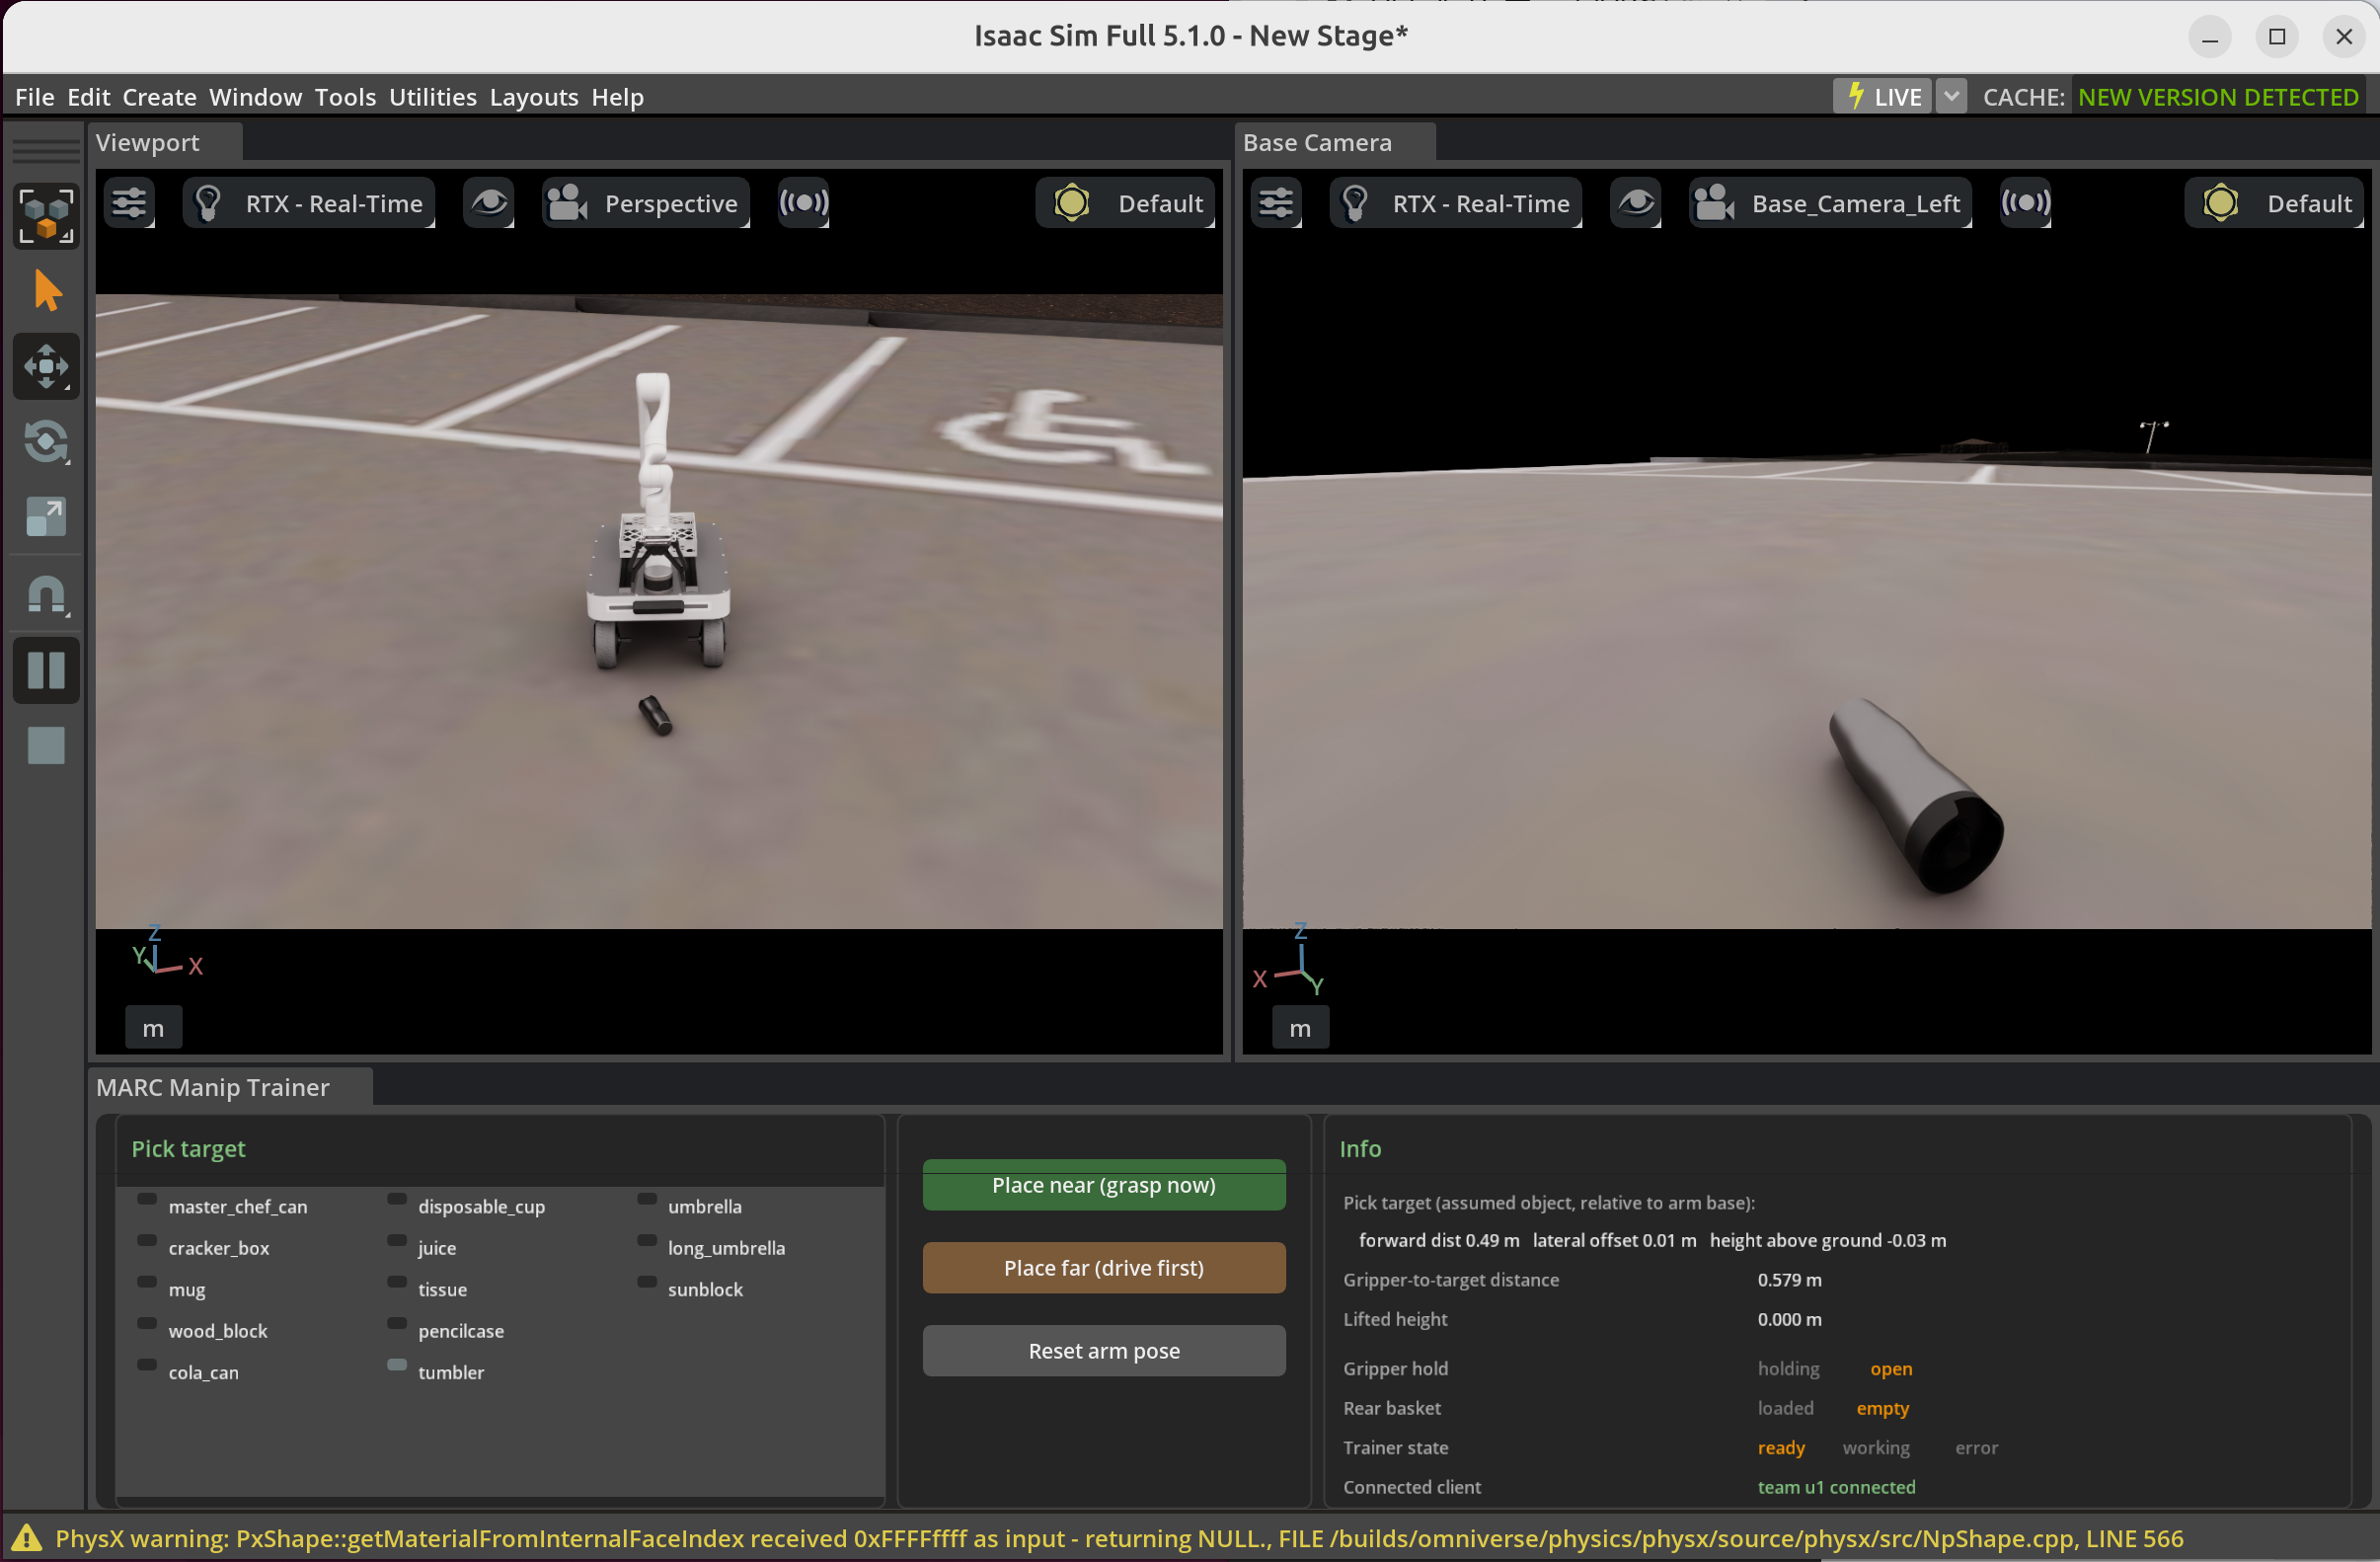
The manipulation practice environment running — left: an overview view (Viewport) that
shows the robot and the object to pick together, right: the robot base camera view
(Base Camera), bottom: the control panel (Pick target, Place near / Place far,
Reset arm pose, status info).
How to use the two together
Use the reference code (arm_kin.py and arm_pick.py) as a starting point to write your
arm-control logic, and it is convenient for that code to use marc_sdk. Since the SDK handles
message conversion and ROS 2 communication for you, you can concentrate on the control logic.
In the competition runtime the SDK also handles the registration handshake; in the practice
environment you just send control commands directly, as described above.
The pick success rate depends heavily on how well you optimize control for the position,
size, and orientation of the object to pick. So in manipulation_trainer, test various
situations repeatedly while changing the object type and placement, and refine or train your
control logic in the process. Here you can practice the whole loop, including state feedback:
check pick/delivery success with is_grasping() and is_basket_occupied(), and retry on
failure. This control-and-query approach is identical to the competition runtime.
Write your control loop as a closed loop that reads the latest joint state
(arm/joint_states, SDK get_arm_state()) and advances one step toward the target each time
fresh state arrives, rather than pushing commands on a fixed real-time schedule (a fixed
wall-clock rate, e.g. every 0.05 s). The platform
steps the physics simulation at a fixed rate and publishes joint state on that step, so on a
development machine where the simulation runs slower than real time (especially with the GUI on
or a lower-end GPU) state updates may arrive less frequently. Advancing on each state update
instead of flooding commands at a fixed period keeps the arm on its intended path regardless of
simulation speed. The evaluation environment runs on high-end hardware close to real time, but
pacing control to feedback this way gives consistent results on both your development machine
and the evaluation environment.
The two approaches compare as follows.
Aspect |
Fixed rate (wall-clock time) — avoid |
State-feedback closed loop — recommended |
|---|---|---|
When commands are sent |
On a fixed real-time interval, regardless of current state |
Whenever new joint state ( |
One cycle |
Wait a fixed time -> send command -> repeat |
Wait for state -> read latest state -> advance one step toward the target -> repeat |
When the sim is slow |
Keeps sending commands without the latest state -> the arm drifts off path |
Advances as state arrives -> unaffected |
Result |
Wobbles with simulation speed |
Consistent path regardless of simulation speed |
Confirming a successful pick and retrying
The platform does not notify pick success or failure in real time as a scoring result, but
you can check whether the gripper is currently holding an object with is_grasping(). This
is the same as the object detection of a real Robotiq 2F-140 gripper: if you command the
gripper to close but the fingers are blocked by an object and cannot close to the target
angle, it is judged as “holding”. You can detect a failed pick that closed on nothing (stays
False) or an object dropped in transit (True -> False) with this signal and retry.
client.send_arm_command(close_gripper)   # command the gripper to close
# ... wait a few control steps for the gripper to settle ...
if not client.is_grasping():
    # the gripper closed on nothing - the pick failed; approach and retry
    ...

# while carrying the object to the drop zone, watch for a drop:
if was_holding and not client.is_grasping():
    # the object slipped out mid-place; go back and pick it up again
    ...
This signal only tells you whether you are holding something; it does not tell you whether
you picked the correct object. Judge that yourself with the robot cameras
(get_robot_image / get_robot_depth).
Delivery success (placing in the basket) is confirmed with is_basket_occupied(). It is
True if an object is currently in the rear basket, and like a real basket-load sensor it
only tells you “whether something is loaded” (not correctness or score). The provided cameras
cannot see the rear basket, so judge whether delivery succeeded or whether the object fell
outside the basket with this signal and retry.
client.send_arm_command(open_gripper)    # release the object over the basket
# ... wait a moment for it to settle ...
if not client.is_basket_occupied():
    # the object missed the basket; pick it up again and re-deliver
    ...