Getting Started
This page has two parts. First it walks you through the fastest path (Quickstart) from a clean machine with nothing installed to seeing the demo actually run, and then it lays out the environment-setup reference you consult during later development. If this is your first time, follow the Quickstart from the top in order.
Quickstart (target: 30 minutes)
The fastest path comes down to three steps: get it -> run it -> run the demo. The actual order of steps is as follows.
Confirm prerequisites — check that your PC meets the required conditions.
Get the starter kit — download the bundle of files that is your starting point for development.
Log in to NVIDIA NGC — the base image you build in the next step is based on NVIDIA’s Isaac Sim image. To pull that Isaac Sim image from NGC, you first need to authenticate with an NVIDIA account.
Install the simulation platform (for practice) — build, on your own PC, the base image that adds the competition environment on top of the Isaac Sim image (the platform image itself is then built automatically in the next step).
Run the platform — run the simulation platform you installed.
Run the demo — run the baseline code and watch the robot’s behavior.
0. Confirm prerequisites
First, confirm that your PC meets the conditions in Environment setup below.
1. Get the starter kit
The starter kit is your starting point for development. It contains the SDK, the baseline code (demo), the Docker recipes, the public scenarios, and the practice background USD, and you build your perception-and-decision logic on top of it.
git clone https://github.com/marc-challenge/marc-starter-kit.git
cd marc-starter-kit
2. Log in to NVIDIA NGC (nvcr.io)
The platform the organizers provide is a simulation environment built on top of NVIDIA’s Isaac Sim. It is provided as Docker so that you can run it easily on your own computer.
There is one thing to prepare, though. The organizers do not have the right to redistribute the Isaac Sim Docker image that this platform is based on. So you must first create your own NVIDIA account and get yourself into a state where you can access the NGC service that NVIDIA distributes the image through.
Once you log in to NGC one time, the platform is then downloaded and installed (built) automatically as you follow the procedure in the starter kit and this guide. Set up your login state with the three steps below.
Create a free account at ngc.nvidia.com and sign in.
Generate an API key — top-right profile -> Account Settings -> Generate API Key (or Generate Personal Key). The key is shown only once, so copy and store it immediately.
Log in to the registry — the Username is the literal string
$oauthtoken, and the Password is the API key you generated.
docker login nvcr.io
# Username: $oauthtoken      <- this exact string, no quotes
# Password: <your NGC API key>
Note
The starter kit’s marc.sh setup command does not perform this login for you. The NVIDIA
account is your own, so you must perform the login above yourself once (once done, it stays in
effect afterward).
Tip
If you want to log in with a single command without typing the password on screen (e.g. an automation script), you can pass the API key via a pipe like this.
echo "<your NGC API key>" | docker login nvcr.io -u '$oauthtoken' --password-stdin
3. Install the simulation platform (for practice)
The simulation platform is the competition environment layered on top of the NGC Isaac Sim
image you authenticated for earlier. The base image underneath it (marc-base:ros2-isaacsim-5.1)
is not pulled from a registry — it is a local image you build once on your own PC. The starter
kit’s setup command takes care of building this base image for you, so at first you only need
to run the single line below (once). This command also shows the NGC login reminder.
bash simulation-platform/marc.sh setup
When the base image build finishes, you will see a message like the following at the end (the
... in the middle is the build log).
[marc] building base image (marc-base:ros2-isaacsim-5.1) - first time only, this takes a while.
...
[marc] setup complete. Next: bash simulation-platform/marc.sh platform
The platform image that sits on top of the base image is built and run automatically by
marc.sh platform in the next step (4. Run the platform). At that point the content the
platform needs is pulled automatically from the public registry (GHCR), so no separate
authentication is required.
Important
Installation (the build) takes a considerable amount of time — it is not frozen. Depending on your computer’s specs and network speed, it can take anywhere from tens of minutes to a few hours. The first run in particular takes longer because it downloads and prepares large data. Even if there seems to be no progress, this is normal, so wait until it completes.
The simulation platform comes with everything needed for the competition.
Digital twin — a virtual environment that reproduces the real Sejong University campus as-is.
Robot — a 4-wheel mobile robot carrying a basket, plus a 6-axis robot arm.
Sensors — fixed CCTV and the stereo cameras mounted on the robot.
ROS 2 interface — exchange commands and data with the robot and sensors in a standard way.
Public practice scenarios — examples you can practice with ahead of time, in the same format as the real problems.
The same installation also prepares the dataset generator and the manipulation training tool (Trainer).
Note
During the build, the data needed for the simulation is downloaded automatically from the internet. If this download is difficult due to your network environment, or you need to build offline, there is a way to download a separately provided content package in advance, extract it, and build from that data (the result is identical). For how to obtain the content package and the build procedure, see the starter kit README.
4. Run the platform
Now run the platform you installed. In this guide, we run with the marc2026_demo scenario,
which works together with the demo you will run in the next step. Move to the platform folder,
then set the scenario to run in .env.
cd simulation-platform
cp .env.example .env
# In simulation-platform/.env
ENV_MARC_SCENARIO=marc2026_demo
Note
The simulation platform included in the starter kit defaults to GUI mode (HEADLESS=false) —
the platform’s 3D viewport and score panel appear as a window. So the container can reach the
host’s display (X server), run the command below once on the host before starting.
xhost +local:root
To run on a server with no display, or when you do not need the GUI, set HEADLESS=true in
.env (in that case xhost is not needed).
The starter kit includes the dataset generator and the manipulation training tool in addition
to the practice platform, so you must select and specify which of these to run. The practice
platform is platform. The two commands below work identically, so choose whichever is
convenient.
# (1) Run directly with docker compose
docker compose --profile platform up

# (2) Convenience wrapper (runs the command above)
bash marc.sh platform
Note
Typing docker compose up alone runs nothing. You must specify the target to run
(platform) as shown above (using marc.sh platform handles this specification
automatically).
Important
The first run takes a considerable amount of time — it is not frozen. Loading the 3D
virtual campus data takes several minutes (typically 2–5 minutes, and longer on the very first
run after the download). During this time the program window shows black, and the operating
system may mark the window as "Isaac Sim" is not responding or show a warning dialog. This is
normal, so do not force-quit — wait. The run is complete when the logs below appear:
[Runtime] Startup complete in <N>s
Auto-plan: waiting for a participant to register...
At that point the practice scene appears in the viewport, and the platform is ready to receive
the register from your participant app. Watch progress with docker compose logs -f.
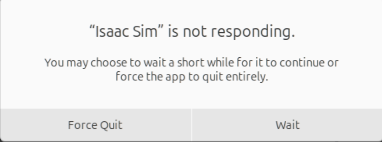
The operating system’s "Isaac Sim" is not responding warning that may appear during the first
run. It is normal, so do not force-quit — press Wait and wait.
5. Run the demo
# Set your team id / token first, then go to the demo directory.
export MARC_TEAM_ID=u1
export MARC_TOKEN=<your-token>
cd demo                  # demo/ is at the starter-kit root
docker compose up        # organizers score with the same command
Running the demo lets you see the whole flow of the agent operating.
The agent connects to (registers with) the platform.
It receives a Stage 1 problem and submits, as its answer, where it found the target.
In Stage 2, the robot moves to the target point.
Once the robot starts moving, it means your agent and the platform are properly connected and work correctly from start to finish.
Note
The demo (baseline code) is not a program that actually solves the problems. To show the flow, the Stage 1 answer submits pre-stored values, and in Stage 2 it moves the robot to a predetermined position and picks the object with a fixed motion. It does not actually analyze the CCTV footage or make its own decisions.
The demo is the baseline code from which you start adding your own code. The communication with the platform and the robot-control wiring are already implemented, so you replace the part that produced the pre-stored answers and positions (the mock implementation) with your own real perception-and-decision code.
Environment setup
The items below are split into software requirements you must meet and the reference development/verification hardware. Each table marks its “Kind” so you can see how far is required and how far is for reference.
Software requirements (must match exactly)
Item |
Kind |
Requirement |
|---|---|---|
OS |
Required |
Ubuntu 22.04 LTS |
NVIDIA driver |
Required |
Run a production driver (validated 580.x, min 570). 590+ beta/developer (Vulkan beta) drivers can crash the RTX renderer (see the FAQ). |
Docker |
Required |
Docker Engine + NVIDIA Container Runtime (GPU use) |
Docker Compose |
Required |
v2 ( |
ROS 2 |
Required |
Humble |
Python |
Required |
3.10 (per ROS 2 Humble) |
NGC account |
Required |
NVIDIA NGC account (free) + API Key (see Quickstart step 2) |
Reference development/verification hardware (for reference — not a minimum spec)
The organizers developed and verified the platform on the specs below. These are reference specs, not a minimum spec — it may run on lower specs, but performance can vary. In particular, an NVIDIA RTX-class GPU is required, and more VRAM is better.
Item |
Reference spec |
|---|---|
OS |
Ubuntu 22.04.5 LTS |
CPU |
Intel Core i7-12700K (12 cores / 20 threads) |
RAM |
128 GB |
GPU |
NVIDIA RTX PRO 5000 Blackwell (48 GB VRAM) |
GPU driver |
580.159.03 (CUDA 13.0 support) |
Docker · Docker Compose
The platform runs with Docker, so the three things below must be in place.
1) Docker Engine. Install a recent Docker. Once installed, check with the following command.
docker --version
It is fine if the version prints on one line as below (the numbers differ per environment).
Docker version 27.3.1, build ...
2) NVIDIA Container Runtime (GPU use). The simulation uses the GPU, so the container must be able to access the GPU. Check that the GPU is recognized inside the container with the command below.
docker run --rm --gpus all nvidia/cuda:12.4.1-base-ubuntu22.04 nvidia-smi
It is fine if a graphics-card information table prints inside the container as below (your PC’s GPU name and driver/CUDA versions are shown).
+-----------------------------------------------------------------------------------------+
| NVIDIA-SMI 580.159.03             Driver Version: 580.159.03     CUDA Version: 13.0     |
|-----------------------------------------+------------------------+----------------------+
| GPU  Name                 Persistence-M | Bus-Id          Disp.A | Volatile Uncorr. ECC |
|=========================================+========================+======================|
|   0  NVIDIA RTX PRO 5000 Blac...    Off |   00000000:01:00.0  On |                  Off |
+-----------------------------------------+------------------------+----------------------+
If you get an error like Failed to initialize NVML or could not select device driver ... gpu, re-check your driver or NVIDIA Container Runtime setup.
3) Docker Compose v2. Every run command in this guide is based on the latest standard,
Docker Compose v2 — that is, the docker compose command with a space. Installing a recent
Docker installs v2 along with it. Check whether it is installed with the following command.
docker compose version
It is fine if the version prints as below (if it starts with v2, it is v2).
Docker Compose version v2.29.7
Note
If the docker compose command does not work, your Docker version is old. Upgrading Docker to
the latest version installs v2 (docker compose) along with it.
How the simulation platform and the participant platform connect
In the preliminary and final judging (scoring) environment, the simulation platform and the participant program are run on two different computers connected over a network, and scored that way. That said, during development it is fine to run the two together on a single computer.
If you want to verify ahead of time under conditions identical to the scoring environment, we recommend connecting the two computers over a gigabit (1 Gbps) or better LAN. The fixed CCTV’s high-resolution (8MP) footage is transmitted over the network, so it needs enough bandwidth to run stably.
Environment variables
Variable |
Default |
Description |
|---|---|---|
|
|
Your assigned team ID |
|
— |
Session token (required) |
|
|
ROS 2 domain; must match the platform |